So many people will tell you to learn git and GitHub when you start coding. They are right. But it isn’t as simple as simple as just learning git.
Like walking into Mordor, there are steps to learning git. Your mind has to be ready to accept the knowledge and only then can you learn the magical codes to make it work.
Version control
Like how you can track changes/suggestions in a text document with MS Word and Google Doc, you can track the changes in a file or folder with git. This way you do not need to save 10 different versions of a Python or R script, each time you change part of the code when adding a feature or fixing a bug - I frequently save ~10 versions of many scripts while getting it to work and adding all the features. But with git you can just have the one file and update it from there. It saves on storage on your computer and even better, you can quickly jump between versions and allow multiple people to work on them at once.
How to use git
The first thing that we need to do is to make a folder that contains a project that we want to track (bunny) and then we can initialise git's tracking of the folder and its contents.
$ mkdir bunny
$ cd bunny
$ git init
Initialized empty Git repository in /Users/jameslloyd/Google_Drive_JPBL/Non_work/Bad_grammar_good_syntax_blog/0yx_git/bunny/.git/
$ ls -l
total 0
$ ls -al
total 0 drwxr-xr-x 3 jameslloyd staff 96 27 Sep 16:48 . drwxr-x---+ 43 jameslloyd staff 1376 27 Sep 16:47 .. drwxr-xr-x 9 jameslloyd staff 288 27 Sep 16:48 .git
What we have done is created a git repository (repo) but it is a hidden folder (that is what the dot (.) in front of git means). So we cannot see it with the usual ls (or ls-l) but we can see it if we use ls -al (where the a does reveal hidden files and folders). Basically the git repo is there and exists but you do not want to interact with it directly. Instead you want to run the commands we will go through below to track the changes you make in this folder you want to track.
$ git checkout -b main
Switched to a new branch 'main'
Changing branch name to main, as often the default in git is "master", which is an outdated name and will be changed in the future.
$ git status
On branch main
No commits yet
nothing to commit (create/copy files and use "git add" to track)
Nothing has been done so not changes have been made
$ touch bunny.txt
Now I have made an empty text file with touch called bunny.txt. It has the .txt extension because I want it to be a simple plain text file, but we could just as easily track the changes in a script with code (such as .py for Python or .R for R). Now you can edit the bunny.txt in whichever way you feel comfortable: on the command line with a text editor like nano or vim (good luck figuring out how to save and exit those), or you can open up the file in Explorer (Finder on Mac) and edit it in your favourite text editor (such as Sublime). The edits we want to make is to add the text: 'A cute cartoon bunny’. You can also use the below bash command to add the text to the file without a text editor:
$ echo "A cute cartoon bunny" > bunny.txt
This is a text document about a bunny we want to describe - After that snippet of text has been added to the text file you can now see it in there (head command prints the first ten lines of the file, as we have only one, we see only one):
$ head bunny.txt
A cute cartoon bunny
Great, the it worked! But now to save it to git repo. Now let’s check the status of the changes in the git so far:
$ git status
On branch main
No commits yet
Untracked files:
(use "git add <file>..." to include in what will be committed)
bunny.txt
nothing added to commit but untracked files present (use "git add" to track)
We can see using git status that it has not been added and is untracked. What we need to do is to save these changes to our git repo. But this is where I got confused when I first tried to learn git. To save these changes to git, it requires two seperate steps: git add and git commit
$ git add bunny.txt
This adds the changes that we made to the bunny.txt file to the git repo, but only in a staging area, it is not fully saved into the repo (see my diagram below). We can see this with git status:
$ git status
On branch main
No commits yet
Changes to be committed:
(use "git rm --cached <file>..." to unstage)
new file: bunny.txt
Changes have been saved but not committed (to the repo). To commit all of the changes that were added (to the staging area), we use git commit and add a comment that details to future us, or other users, what was changed (see my diagram below).
$ git commit -m "We started to describe the bunny in the text file"
[main (root-commit) f5cab72] We started to describe the bunny in the text file
Committer: James Lloyd <jameslloyd@James-MBP.local>
Your name and email address were configured automatically based
on your username and hostname. Please check that they are accurate.
You can suppress this message by setting them explicitly. Run the
following command and follow the instructions in your editor to edit
your configuration file:
git config --global --edit
After doing this, you may fix the identity used for this commit with:
git commit --amend --reset-author
1 file changed, 1 insertion(+)
create mode 100644 bunny.txt
Good, we made the changes. Now if we check git status again, no changes are left to add to the repo:
$ git status
On branch main
nothing to commit, working tree clean
That is great then. But what if we wanted to make more changes. We can just open up the text file again (as above with your favourite text editor) and add this code to the bottom of the text file 'then a lion came and ate the bunny':
$ echo "then a lion came and ate the bunny" >> bunny.txt
And then we can look at the text file to see the changes:
$ head bunny.txt
A cute cartoon bunny
then a lion came and ate the bunny
Please do not worry, no actual rabbits were harmed in the making of this blog post. With git status we can see that we need to add these changes
$ git status
On branch main
Changes to be committed:
(use "git restore --staged <file>..." to unstage)
modified: bunny.txt
We can now add this and commit it as before:
$ git add bunny.txt
$ git commit -m "We add a horrible part of the story about a lion"
[main 1dd5e8f] We add a horrible part of the story about a lion
Committer: James Lloyd <jameslloyd@James-MBP.local>
Your name and email address were configured automatically based
on your username and hostname. Please check that they are accurate.
You can suppress this message by setting them explicitly. Run the
following command and follow the instructions in your editor to edit
your configuration file:
git config --global --edit
After doing this, you may fix the identity used for this commit with:
git commit --amend --reset-author
1 file changed, 1 insertion(+)
Great, we have made progress. We can see with my diagram below how this works visually, first you make changes in the document (green represents the edits) and then you stage the edit into the staging area of the git repo with the git add command and then you can take it from the staging area to the main repo and add it as a new committed change to that repo.
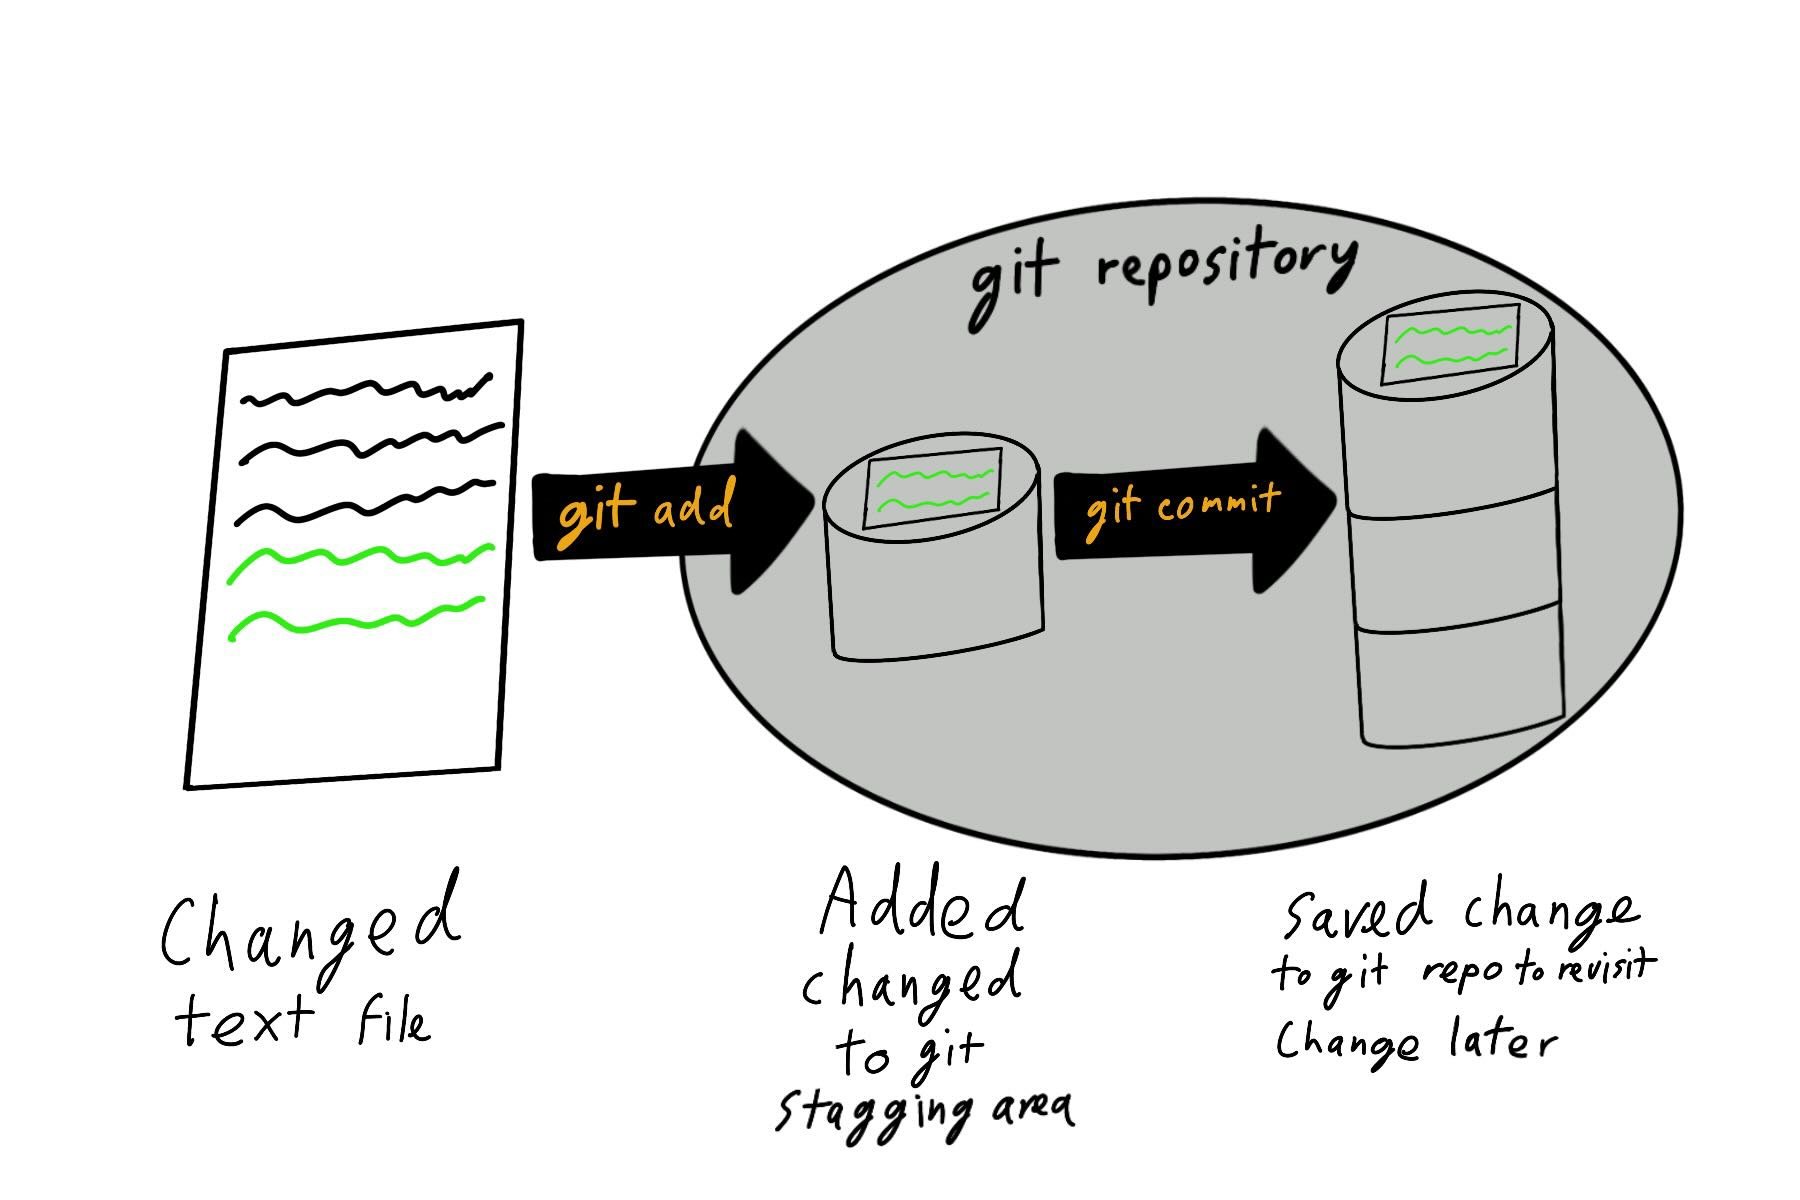
Details of how to save changes in a file to a git repo.
But what if we didn't like this change and wanted to undo it (revert back to an older version of the text). Using git status we can confirm that we have no modifications that need to be saved (added and committed). With git log we can now see a history of changes and we can see two commits have been added to the main branch:
$ git status
On branch main
nothing to commit, working tree clean
$ git log
commit 1dd5e8f89cdbd6cba70fe4d532d158fb7280f7ec (HEAD -> main)
Author: James Lloyd <jameslloyd@James-MBP.local>
Date: Tue Sep 27 17:04:49 2022 +0800
We add a horrible part of the story about a lion
commit f5cab72a0f7c9f9796db0ff65559e49b95f78949
Author: James Lloyd <jameslloyd@James-MBP.local>
Date: Tue Sep 27 17:01:47 2022 +0800
We started to describe the bunny in the text file
Each commit has a long code that gives it a unique identifier. What if we start to feel guilty about the bunny being eaten? Well we can go back to an older version of the document with git revert and then committing that change.
$ git revert --no-commit 1dd5e8f89cdbd6cba70fe4d532d158fb7280f7ec
$ git commit -m "Removing the lion from the story"
[main d1f4c97] Removing the lion from the story
Committer: James Lloyd <jameslloyd@James-MBP.local>
Your name and email address were configured automatically based
on your username and hostname. Please check that they are accurate.
You can suppress this message by setting them explicitly. Run the
following command and follow the instructions in your editor to edit
your configuration file:
git config --global --edit
After doing this, you may fix the identity used for this commit with:
git commit --amend --reset-author
1 file changed, 1 deletion(-)
Now we have reverted back to the version without the lion (the first commit) but using git revert and providing the unique ID to the one we want to axe (1dd5e8f89cdbd6cba70fe4d532d158fb7280f7ec). In this case we went one step back. The no-commit argument meant that we did not have to use the vi text editor to add out commit description and we can do it in the usual way (git commit -m). Now we can look at the git log and see that we have a new commit, which was simply reverting us back to the first one. There are other ways to do this in git but this way we can keep track of going back and forth.
$ git log
commit d1f4c971018798cf4032e36344434df30ee72a65 (HEAD -> main)
Author: James Lloyd <jameslloyd@James-MBP.local>
Date: Tue Sep 27 17:07:30 2022 +0800
Removing the lion from the story
commit 1dd5e8f89cdbd6cba70fe4d532d158fb7280f7ec
Author: James Lloyd <jameslloyd@James-MBP.local>
Date: Tue Sep 27 17:04:49 2022 +0800
We add a horrible part of the story about a lion
commit f5cab72a0f7c9f9796db0ff65559e49b95f78949
Author: James Lloyd <jameslloyd@James-MBP.local>
Date: Tue Sep 27 17:01:47 2022 +0800
We started to describe the bunny in the text file
We can confirm that the text file in the working directory has been changed by reading the file:
$ head bunny.txt
A cute cartoon bunny
As you can see, everything is behaving as we wanted it too; a cute bunny with no mean lion. But what now? But now what if we want to do something experimental? If we have a couple of ideas on how to improve our text, then we can try both seperate and see how each works. So first we must make a branch of our file/code - a branch away from main. One case to do this would be if you had a function script that you did not want to alter as the main branch, but wanted to add a new function or feature to the code, so you branch it, add the feature and work on it until it works. Once you are happy with it, you can make that the main branch. This would be good if you are still running analysis with the main branch version of the code, but want to experiment with an updated (test) version of the script. The below command confirms that we are on the main branch (currently our only branch).
$ git branch
* main
So if we wanted to experiment with the colour of the bunny in our story, we can do so in a branch. But first we need to create a branch and then switch to it:
$ git branch painted main
$ git switch painted
Switched to branch 'painted'
$ git branch
main
* painted
We have now made a branch called painted and switched to it (you can either use git switch or git checkout to do the switching but I recommend git switch). Now we can edit the script as we have done before, now added text to describe the bunny's colour 'The bunny is a lovely shade of purple' and you can do so with the below text:
$ echo "The bunny is a lovely shade of purple" >> bunny.txt
$ head bunny.txt
A cute cartoon bunny
The bunny is a lovely shade of purple
$ git add bunny.txt
$ git commit -m "We painted the bunny purple"
Committer: James Lloyd <jameslloyd@James-MBP.local>
Your name and email address were configured automatically based
on your username and hostname. Please check that they are accurate.
You can suppress this message by setting them explicitly. Run the
following command and follow the instructions in your editor to edit
your configuration file:
git config --global --edit
After doing this, you may fix the identity used for this commit with:
git commit --amend --reset-author
1 file changed, 1 insertion(+)
$ git status
On branch painted
nothing to commit, working tree clean
We have now painted the bunny (with words at least), checked the change works in the file and now we have saved the changes in the git repo (in the painted branch). This is great but what if you had a different idea for how to change the appearance of the bunny. Perhaps a colleague doesn't want it purple but instead thinks that it should be a killer rabbit with sharp, bloody teeth (better get a Holy Handgranade ready, just in case). Now we can just need to repeat the above steps but to copy main and alter it:
$ git branch bloody_fangs main
$ git switch bloody_fangs
Switched to branch 'bloody_fangs'
$ git branch
* bloody_fangs
main
painted
$ echo "The bunny has fangs with blood dripping off them" >> bunny.txt
$ head bunny.txt
A cute cartoon bunn
The bunny has fangs with blood dripping off them
$ git add bunny.py
$ git commit -m "We gave the bunny nasty fangs like from the Monty Python film"
[bloody_fangs 33a6050] We gave the bunny nasty fangs like from the Monty Python film
Committer: James Lloyd <jameslloyd@James-MBP.local>
Your name and email address were configured automatically based
on your username and hostname. Please check that they are accurate.
You can suppress this message by setting them explicitly. Run the
following command and follow the instructions in your editor to edit
your configuration file:
git config --global --edit
After doing this, you may fix the identity used for this commit with:
git commit --amend --reset-author
1 file changed, 1 insertion(+)
OK so now we have a a version of the text file with the bloody fangs saved. Now that we have seen the two new versions, perhaps we want to add both of these features into a main branch to roll out production. Well we can do that. First we need to move act to the main branch:
$ git switch main
Switched to branch 'main'
$ git branch
bloody_fangs
* main
painted
$ git merge painted
Updating d1f4c97..e6719f1
Fast-forward
bunny.txt | 1 +
1 file changed, 1 insertion(+)
$ head bunny.txt
A cute cartoon bunny
The bunny is a lovely shade of purple
Now that we have merged one branch into main that worked well, but what if we try to merge the second now?
$ git merge bloody_fangs
Auto-merging bunny.txt
CONFLICT (content): Merge conflict in bunny.txt
Automatic merge failed; fix conflicts and then commit the result.
$ head bunny.txt
A cute cartoon bunny
<<<<<<< HEAD
The bunny is a lovely shade of purple
=======
The bunny has fangs with blood dripping off them
>>>>>>> bloody_fangs
So git could not automatically merge these. But do not worry. We can manually fix this and then commit the changes. Open the file in your favourite text editor (as before) and the delete the <<<<<<< HEAD, =======, and >>>>>>> bloody_fangs lines. Save the file in the text editor and return to the command line and then:
$ git add bunny.txt
$ git commit -m "merged and resolving merge issues"
[main 868a35c] merged and resolving merge issues
Committer: James Lloyd <jameslloyd@James-MBP.local>
Your name and email address were configured automatically based
on your username and hostname. Please check that they are accurate.
You can suppress this message by setting them explicitly. Run the
following command and follow the instructions in your editor to edit
your configuration file:
git config --global --edit
After doing this, you may fix the identity used for this commit with:
git commit --amend --reset-author
1 file changed, 1 insertion(+), 4 deletions(-)
And now we can look at and run the text file to see if we managed to merge the two changes into the main properly:
$ head bunny.txt
A cute cartoon bunny
The bunny is a lovely shade of purple
The bunny has fangs with blood dripping off them
Yes it is now fully merged with no conflicts and is working as we expected. Below you can see a cartoon representation of the branches and the changes that we made (enjoy my debatably cute bunny drawings). In practice, you might want to stick to just one development branch and then merge than with main, but in this practice example we can see the issues caused by a conflict that needed to be resolved.

Diagram of how git branches work, with cartoon bunnies.
What is GitHub?
That is a lesson for another day (time permitting). But GitHub is a website where you can store code either privately or publicly. It is great if you need to collaborate with others on your project, or to have a backup of your code off your computer to prevent catastrophic data loss.
But this post was simply a taster to help ease people into using git at all. Hopefully you now know enough of the basics to be able to go off and start looking at other courses and tutorials to help you become experts (and then you can tackle GitHub).
Acknowledgements
Many thanks to Philipp Bayer (Twitter: @PhilippBayer) and Craig Duncan (Twitter: @craigduncanlab) for feedback on this post in the drafting stages.
End and further reading
https://swcarpentry.github.io/git-novice/07-github/index.html
https://www.youtube.com/watch?v=USjZcfj8yxE
https://coderefinery.github.io/git-intro/branches/
Edits: I changed the title from Git for digital dummies to Git for digital noobs to avoid ablest language.